Tuesday, November 19, 2013

Rosemary Saffron Risotto with Goat Cheese

It's been awhile since my last post. Things have been really busy around here lately and I have been in and out of town. The exciting part is that Thanksgiving is coming up soon and I will be out of town again! One of my all time favorite holidays :) There is so much wonderful aspects of Thanksgiving that I love. The food is just awesome (I mean seriously, whoever thought of turkey and cranberry sauce together is a genius), and having any excuse to be with family is my kind of holiday.

As Thanksgiving gets closer and closer my need for good hearty food increases. Tonight, I decided to try my hand at some risotto. I always thought it was pretty hard to make (mostly because of all those cooking competition shows where the judges force them to make risotto and then tell them how horrible it is). It is actually surprisingly easy, maybe that is just because I am making it wrong or something...but comparing it to all the risottos I have had at restaurants and made by other people before, I think it turned out pretty much like those. I used flavors that are very hearty and remind me of this time of year (saffron actually reminds me of any time of year because persians tend to use it all year round..). This is a very filling dish, so save room in the fridge for left overs :) Also, I do not consume alcohol in any way, shape, or form (even cooking or baking with it), so you will notice my recipe lacks the traditional white wine part to it, if you feel like it is necessary go ahead and add it in, but to be honest mine turned out pretty delightful without it. :)

Rosemary Saffron Risotto with Goat Cheese

Ingredients:

1 1/2 cups arborio rice
4 1/2 cups stock (chicken, vegetable, beef, any kind you want)
1 medium onion (chopped into small pieces)
3 garlic cloves (minced)
3 tbsp butter
1 tbsp oil (any kind you like)
1/4 cup parmesan cheese
1/4 cup goat cheese
1 zucchini (chopped)
2 tbsp balsamic vinegar
sea salt (to taste)
1 tsp fresh ground pepper
2 tsp dried rosemary (chopped)
1/4 tsp saffron flakes (ground to a powder)
1/2 tsp dried parsley
extra goat cheese for crumbling on top

Directions:

In a medium pot boil the stock on high. Once it is boiled, turn it down to a simmer. In another medium sauce pan, melt the butter and oil together. Add in the onion and garlic and let simmer. Next add in the rice and coat rice with the butter/oil mixture (do not let the rice brown). Ladle in a scoop of broth and stir as the rice absorbs the broth. Keep doing this until the pot is empty of broth and the rice has become very starchy and creamy (stir constantly). Add in the saffron, rosemary, parsley, pepper, and salt as you are adding in the broth. Let the spices simmer together as the rice absorbs the broth. Next add in the two different cheeses and stir the risotto until all the cheese is melted and mixed into the rice (should resemble a nice yellow creamy risotto mixture...) (This all takes about 20 minutes)

In a separate pan on medium heat,  heat up 1 tsp oil and add in the chopped zucchini. Let the zucchini simmer for a little while and then add in the balsamic vinegar and let that coat the browned zucchini. Next add the zucchini into the risotto and stir. Transfer to a bowl and top with crumbled goat cheese. Enjoy!


Saturday, November 9, 2013

Sweet and Simple Double Chocolate Brownies

In my opinion brownies are probably the easiest baked good to make gluten-free. With regular brownie recipes the amount of flour that people use is pretty much around 1/2 cup or sometimes less. Mostly brownies are just eggs, butter, sugar and cocoa powder. These brownies are just as simple, and they have the added bonus of being gluten-free friendly, and yet still moist and delightful.

For the flour feel free to use any kind you prefer. I have made this recipe using almond flour, oat flour, coconut flour, chickpea flour, and hazelnut flour. I like how they turn out with almond or coconut flour the best (but that is just my preference).  I have never tried them with any kind of rice or quinoa flour (that is really just because I don't really like those ones) but I am sure they would turn out fine with those flours too. Baking should be fun and you should feel like you can tailor it to your own personal tastes and likes. Be brave and experiment! For the most part those experiments always turn out pretty tasty, even if they don't look too pretty :) .


Sweet and Simple Double Chocolate Brownies

Preheat oven to 350 F , grease an 8x8 cake pan

Ingredients:

1/2 cup melted butter
1/2 cup unsweetened cocoa powder
1 cup of coconut sugar
2 eggs
2 tsp vanilla extract
1/2 cup almond flour (or whatever flour of your choice)
1/4 tsp salt
1/2 cup dark chocolate chips

Directions:
In a mixing bowl pour in the melted butter. Add the cocoa powder, vanilla, and sugar to the butter, mix all together. Next, add in the eggs, make sure they are mixed in and blended completely with the batter. Then add in the salt and flour, mix thoroughly. Last, add in the chocolate chips, make sure that they are spread evenly throughout the batter. Pour batter into the greased pan, smooth out with a spatula so that it is even distributed in the pan. Place in the oven on the middle rack and bake for 25 minutes or until a toothpick comes out of the middle clean. (do not over bake, this will make the brownies dry, not moist).  Let cool in the pan for 8-10 minutes before serving. Enjoy!


Tuesday, November 5, 2013

Banana Chocolate Chip Cookie Pillows

My husband loves cookies. Actually, he just really loves any kind of sweet thing. Which can get both of us into trouble because I love baking any kind of sweet thing! It makes for a great pairing of me baking and him eating, but it does not lend to a very good teeth-not-getting-cavities friendship. So, I am trying to come up with some not as sweet but still sweet cookie recipes. Here is one that I came up with tonight using what ingredients were in my cupboard and fridge. (A lot of my recipes recently are using gluten free oat flour, this is not because I particularly prefer oat flour to other flours, it is just because currently that is the only flour in my cupboard and I have yet to go shopping for more flours...however, I am discovering some great recipes using it :) ). I really wasn't too sure what to call these. They look like little cookies crossed with scones. They taste like banana bread cookies/muffins. I am deciding to call them cookie pillows because I like the word "pillow" and just really wanted to use it in the title of a recipe :) .  These are sugar-free, gluten-free and dairy-free but not flavor or yummy-free.  They are good with green tea, milk, and just eating by themselves, but not good as actual pillows..so don't try sleeping on them. Just eat them.


Banana Chocolate Chip Cookie Pillows

Preheat oven to 350 F, line a baking sheet with parchment paper, makes 9 cookie pillows

Ingredients:
2 mashed bananas
1 egg
1 cup gluten free oat flour
1 tsp cinnamon
1/2 cup chocolate chips
1/2 tsp baking powder
1/2 tsp baking soda
1 tsp vanilla extract

Directions:
In a mixing bowl, mash the two bananas together (I usually just use a fork to do this). Add in the egg and the vanilla into the mashed bananas, mix completely. Next add in the cinnamon and stir into the banana egg vanilla mixture. Then add in the flour, baking soda, and baking powder, mix thoroughly (do not over mix). Last, add in the chocolate chips and mix in evenly. Spoon out the batter onto the baking sheet with a regular kitchen spoon, space out the cookies evenly on baking sheet. Place in the oven and bake for 15 minutes or until the cookies have puffed up and are golden brown on top. Take out of oven and let stand for 3 minutes before transferring them to a wire cooling rack. Let cool for 5 minutes before serving. Enjoy!


Sunday, November 3, 2013

Mushroom Cranberry Balsamic Noodles with Lemon Zest and Chili

Being creative and trying out new flavor combinations is always a fun experience. Even more so when the combinations turn out pretty awesome. Tonight's dinner consisted of familiar flavors that I had never previously tried together.

I love pasta noodles and finding a good gluten free brand has been interesting. I first tried pasta made with rice and never really enjoyed the flavor or how soggy they always ended up getting. I then tried buckwheat but didn't really care for those either. Quinoa and corn have been my favorite so far. I try not to eat too much corn and try not to eat too much quinoa either (for some reason both of these give me indigestion if I have them frequently). It's always nice to have pasta every once in a while and so tonight I went with SamMills 100% Corn Pasta (the spaghetti kind). I like them because they are GMO free (at least that is what the bag says so I am choosing to believe it :)).

I hope you enjoy this yummy new recipe! Let me know what you think on the comments below! :)


Mushroom Cranberry Balsamic Noodles with Lemon Zest and Chili

Bring water to boil in a medium size pot

Ingredients:

Pasta:
1/2 bag of spaghetti noodles
2.5 quarts of water
a pinch of salt

Mushroom Cranberry Sauce:
1 container of mushrooms (washed and sliced)
1 medium onion (peeled and diced)
3 garlic cloves (minced)
1/2 cup balsamic vinegar
1 1/2 tbsp olive oil
1 tsp fresh ground black pepper
1 tsp garlic powder
1/4 tsp ground thyme (or 1/2 tsp dried thyme leaves)
1/2 cup dried cranberries
1 tbsp honey
1 tsp chili pepper flakes
the zest of 1 lemon
a pinch of saffron flakes

Directions:

Bring water to a boil and add in the pasta (let cook for about 7 minutes at a rapid boil and stir occasionally), when pasta is done, drain in sink and set aside.
In a medium size pan place on burner and turn the stove up to medium heat. Add the oil, onion, garlic, and mushrooms, let them sauté for 5 minutes. Then add in the balsamic vinegar, honey, and spices. Cover and let simmer for 5 minutes. Add in the pasta and mix completely so that the sauce and veggies cover the pasta noodles. Add in the lemon zest and mix again. Place in bowls and add a little more zest if you want for garnish and some extra chili flakes, or just serve as is.

(as a side dish I made some steamed broccoli and didn't put anything else on them..other than steam... :))


Saturday, November 2, 2013

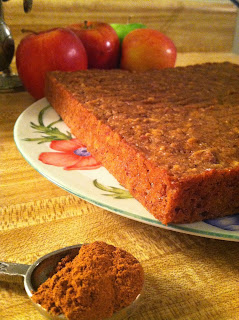
Apple Doodle Brownie

What is this apple doodle brownie you speak of? Well I will tell you (side note: whenever I say apple doodle brownie I can't help but get that Yankee Doodle song stuck in my head...and now it is probably stuck in yours..).

A few days ago I was putting together a recipe for an apple cake because I have way too many apples in my fridge right now (this is because I bought a big bag of red delicious apples and then I found out my husband does not like those..so I bought a big bag of gala apples which he does like but not enough to eat them all day every day). Because of this over abundance of apples the apple cake was made. However, according to one of my friends it did not taste like an apple cake. Instead it tasted like a cross between an apple cake, a snickerdoodle cookie, and a brownie. Hence the name, apple doodle brownie, was coined. It just so happens to also be DELICIOUS.

Here is the recipe for this yummy new creation. Hope you enjoy! 

Apple Doodle Brownie 

Preheat oven to 350 F, grease an 8x8 cake pan

Ingredients:
2 medium size apples (grated)
1 cup gluten free oat flour
1/2 cup dark brown sugar
1 tsp cinnamon
1/3 cup coconut oil (softened not melted)
2 eggs
2 tsp baking spice (this is a mixture of cinnamon, nutmeg, mace, and ginger) 
1 tsp baking powder
the juice of 1/2 of a lemon 

Directions:

In a mixing bowl of KitchenAid mixer, grate in the two apples. Then add in the sugar, oil, and eggs. Mix together. Next squeeze in the lemon juice. Add in the cinnamon, baking spice, flour and baking powder. Do not over mix but make sure everything is completely incorporated into the batter. Pour the batter into the greased cake pan and place in the middle of the oven. Bake for 20 minutes or until a toothpick stuck in the center comes out clean. Let cool for 8 minutes before transferring to wire cooling rack to cool completely. (I just flip the pan onto the rack and the cake usually come out after a few good taps). 

Enjoy! 


Melty Chocolate Chip Cookies

Ever since I stopped eating gluten I have been searching for a good chocolate chip cookie recipe. All my recipes always ended up turning out more muffin or cake-like than cookie-like. I guess I just needed to be persistent with my cookie experimentation, because I  can now give to you my success! Finally :)

I hope this cookie recipe turns out as amazing for you as it did for me. Make sure to use parchment paper (not wax or aluminum).

These go great with tea (I had mine with a yummy cup of scottish heather black tea, tastes like scotland...minus the haggis, kilts, and hairy cows...)
They would also be delicious with a nice cold cup of almond milk (or whichever you prefer) or a big mug of hot chocolate.

Whatever you decide to pair them with (or just eat them stand alone) I hope you get as much enjoyment out of their buttery chocolate yumminess as I do. :)


Melty Chocolate Chip Cookies

Preheat oven to 350 F , line a baking sheet with parchment paper, makes about 18 cookies

Ingredients:

1/2 cup butter (softened, not melted)
1 cup gluten free oat flour
1/2 cup light brown sugar
1 egg
1/2 tsp vanilla extract
1/2 tsp baking powder
1/2 tsp baking soda
1/4 tsp sea salt
A dash of cinnamon (I kid you not, it was a last minute addition so I did not measure it out...I just threw a "dash" in...not a tsp that is for sure)
1/2 cup chocolate chips (I used semi-sweet, you can use milk or dark if you like that better)

Directions:

In a KitchenAid mixer or mixing bowl add together the butter, sugar, and vanilla. Cream together on low until all the butter and sugar lumps are smoothed out. Add in the egg and mix on low until incorporated. Next add in the flour, baking soda, baking powder, salt and the dash of cinnamon (do not over mix). Last add in the chocolate chips and make sure they are evenly added throughout the dough.

Place the bowl in the fridge for about 30 mins to let the dough harden (because after first mixing it is very soft and buttery). Take dough out after the 30 mins and use a regular tablespoon to scoop out cookie dough and roll into little balls and then pop them on the baking sheet. Place on middle rack in oven and bake for 10 mins or until tops and edges of cookie are a nice darker golden brown color. Let cool on the baking sheet for 5 minutes and then transfer to a cooling rack to completely cool or just transfer them to your mouth and enjoy the ooey gooey cookie-ness.